Sewing Fur Made Easier

So we purchased a commercial fur sewing machine – I should explain this process: Jeff has been checking out fur sewing machines (a most useful tool) for a while and found a used one on Craigs list in Boston, where Anja and Duff made arrangements to pick it up, but they had to wait until Zach needed to travel to New England for work (from Ohio) with his pick-up truck, so they could physically get this machine, which is attached to a heavy duty table, and then Zach drove home via Carlisle and dropped the machine off.
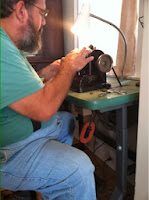
Jeff threading the machine

This is not at all like an ordinary sewing machine and it does amazing seams with fur – the seam looks similar to one made by a serger machine, but much, much finer.  Up to now, we had been using Tina’s rather nice, regular sewing machine, but the fur was pretty hard on it.  Despite this, Anja and Jeff made several raccoon hats before  – see older blog post – and last year we made a fur stole for Grammy, which turned out ok as well.  Looks like this winter we’ll get to sew in a much more efficient way!

As One Shed Goes Up – Another Tumbles Down

We finally tackled the big tear-down project:  the old goat pen.   The goat pen is basically a miniature barn, with a hay loft on top – but the goats got everywhere, and left their droppings everywhere as well. This building has always been beyond repair, and even our homeowners insurance does not cover it.  We thought the three day weekend would give us plenty of time to tackle the project, except that we also had to prune 700 grape vines and plant the second patch of corn.


Sunday

It was not until Sunday afternoon that we actually got started.  We began by tearing off the first outside boards and cleaned out everything from the attic level.    It was a smelly, dusty mess… we carted 2 full wagonloads of junk to the burning pile, and started a stack of lumber that can be re-used.  We basically saved all the old barnboards that looked somewhat salvageable, removing all the nails and hardware before stacking.

Mid-day Monday

On Monday morning we continued tearing off the outside siding boards and removing everything from the lower level of the goat pen.  Another two wagonloads of junk was carted to the burning pile, and our lumber stack started to grow.   By lunchtime,  daylight was visible through all sides.  We stopped tearing off the final boards because every time we tried prying a board off, the building started to shake.

Lars and Jeff took off the tractor bucket, so that Jeff could use the bracket as a ramming tool.  It only took about 10 minutes for the building to collapse once the tractor started pushing:

By Monday evening, this is what was left:


Produce Stand – Part 2

There has been progress on the produce stand:  the “boys” worked on it a little all through the week, adding the roof trusses,  measuring and cutting tin and getting more supplies. Caleb and Lars finished putting on the roof this evening:

Posted in DIY

Building a Produce Stand – Part 1

Looks like we will have a movable produce stand for the vegetable and fruit season this year.  The motivation behind building a produce stand comes from Caleb and Samantha.  Some of the design improvements come from Jeff and most of the labor is done by Caleb and Lars 🙂

The project has been going on during the week, when the floor and walls were put together separately.  The stand is designed to be “moved”, meaning there are strong beams under the floor, which can be attached with chains to the tractor.  Today, they dragged the floor base to the “seasonal location”, right off the new gravel patch by the grape field.  It took some time to level the base on cement blocks, but once that was done, they assembled the wall pieces and started to add the siding to keep it straight.  Unfortunately it got dark before they finished the siding … but tomorrow is another day.

First steps to building the produce stand:

Build Walls
Build Floor


Level some more…
Move to desired location,
level and assemble


Start adding siding
Posted in DIY

Installing Drain Tiles

While Tina was in Boston for a few days, Lars and Jeff made huge progress with laying drain tiles near the lower pond, where the overflow turns into a small stream.  We had already installed a “running” bridge, so we could walk – and run – around the pond, but there was no way to take the four-wheeler or even the tractor from one field to the next. 

They cleaned out the small stream bed and made space for 2 sections of drainage tile.  Each section is about 18 inches in diameter, and 8 ft long.  After they placed the tiles, Jeff used the tractor and back-filled against them, making a path across.  It is certainly very efficient and a lot cleaner looking.

Posted in DIY