Greenhouse Installation

It has been a while since we purchased our greenhouse (see previous post).  We finally had time to actually set it up in it’s permanent place, i.e. in the herbgarden in front of the house.

We started by clearing the space, measuring out the dimensions and marking the four post holes. We used the posthole digging attachment with the tractor to make the holes.

Next we cemented the four corner posts and let them settle overnight.  The next day, we build the frame that would anchor the greenhouse, leveled it and started filling it with gravel.

In order to keep the greenhouse level, we had to really built up the back part of the plot.  We used field stones from an old stone wall to build a retaining wall, and back-filled with gravel and dirt.

Once the frame was solid, and the inside filled with gravel, we laid down large cement platters for a center walkway.  After that is was just a matter of carrying the greenhouse frame (no glass yet) and securing it to the foundation.

Next step:  installing all the glass panels, the door and the louvered windows…

A Greenhouse!

We had another lucky “Craigslist” find this weekend.  Around 10:00 in the evening, Jeff was browsing through the “Farm and Garden” category and someone had just posted an ad for a Greenhouse.  Not just any greenhouse, but an 8 by 12 ft GLASS greenhouse.  Jeff emailed immediately, and a few minutes later the phone rang.  It was the couple selling the greenhouse – we were the first persons to contact them, and we got it!  We drove to Hershey the next day to see it, and pay for it, and then went back with a trailer and a lot of tools (and helpers!), to dis-assemble the greenhouse and take it home.

The greenhouse is in really good shape, and we were able to order replacements hardware from a greenhouse manufacturer in the UK.  Seems that the majority of greenhouses in the US are made with high tech plastics, not glass, but in England the preference seems to be toward glass greenhouses.  Shipping will take about 2 weeks they said.

In the meantime, we re-assembled the structure, and carefully stored the glass in the barn.  We figured that if we did not put the greenhouse  back together while we still remembered how it came apart, it would turn into a major fiasco later on.
So the structure is sitting in the back yard, while we are making a spot for it in the herb-garden – between the house and the garage.  This is a very sunny spot, and putting the greenhouse between two existing buildings should shield it from the high speed winds.  We will have to do some leveling first, then concrete in some posts, and get a bunch of pressure treated lumber for the foundation.  And we need to get a load of gravel for the floor. Updates will come later…
Posted in DIY

Bathtub “Upcycling”

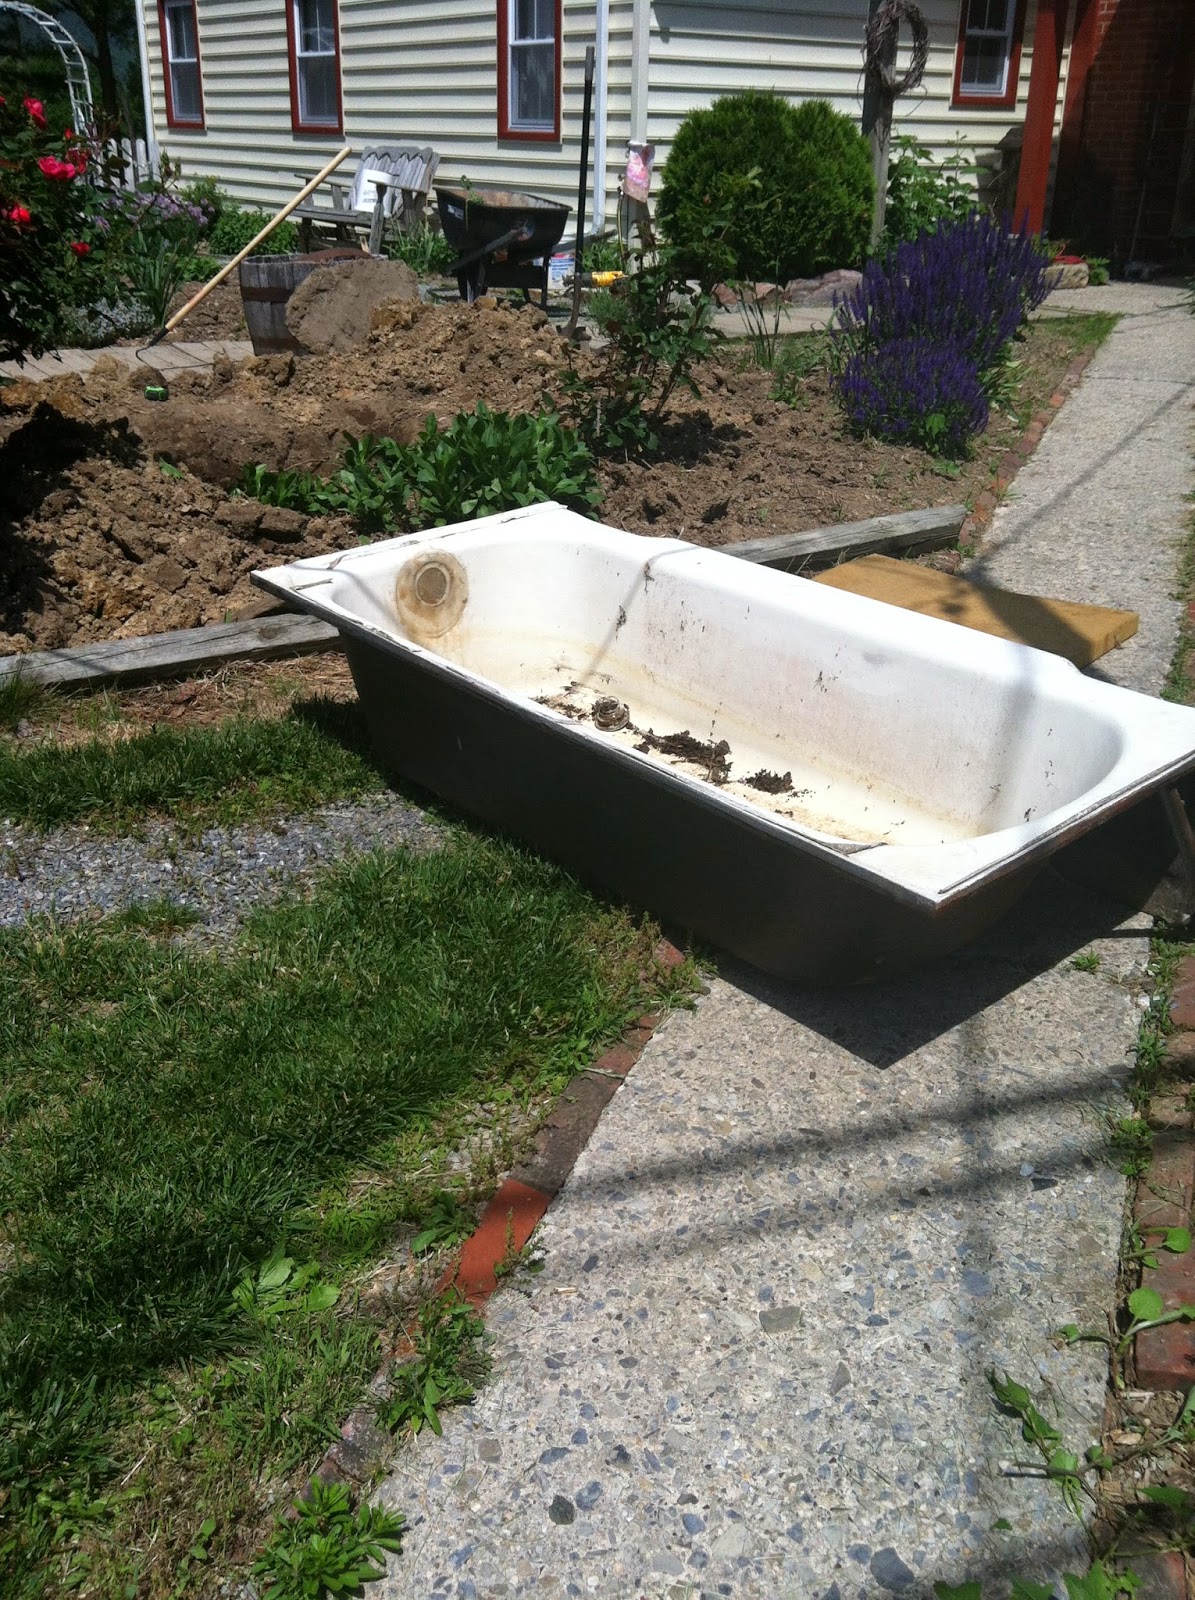
Here is a relatively quick garden project – literally done in one afternoon – with just minimal help from some strong guys:  create a small pond from an old discarded cast iron bathtub.

We did have all the necessary supplies:

  • cast iron bathtub
  • fiberglass resin and reinforcement cloth
  • left over spray paint in shades of black, brown or dark green
  • pond pump and access to electricity 
  • spade shovel and digging iron
  • slate or other larger stones
  • water hose
  • optional: fountain and goldfish
Our project was not planned at all.  It started out with us cleaning up all the junk metal to be taken for recycling.  Among those metal pieces was our old bathtub, which we had taken out when we installed the whirlpool tub. Later that day, as I was weeding a flower bed, I was bothered once again by the fact that our pretty “pouring-lady” fountain really should be put back to use, rather than just leaning against a tree stump.  I mentioned this frustration to Jeff, who suggested re-using the old bathtub.
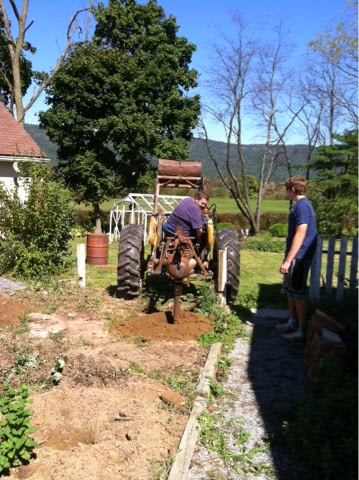
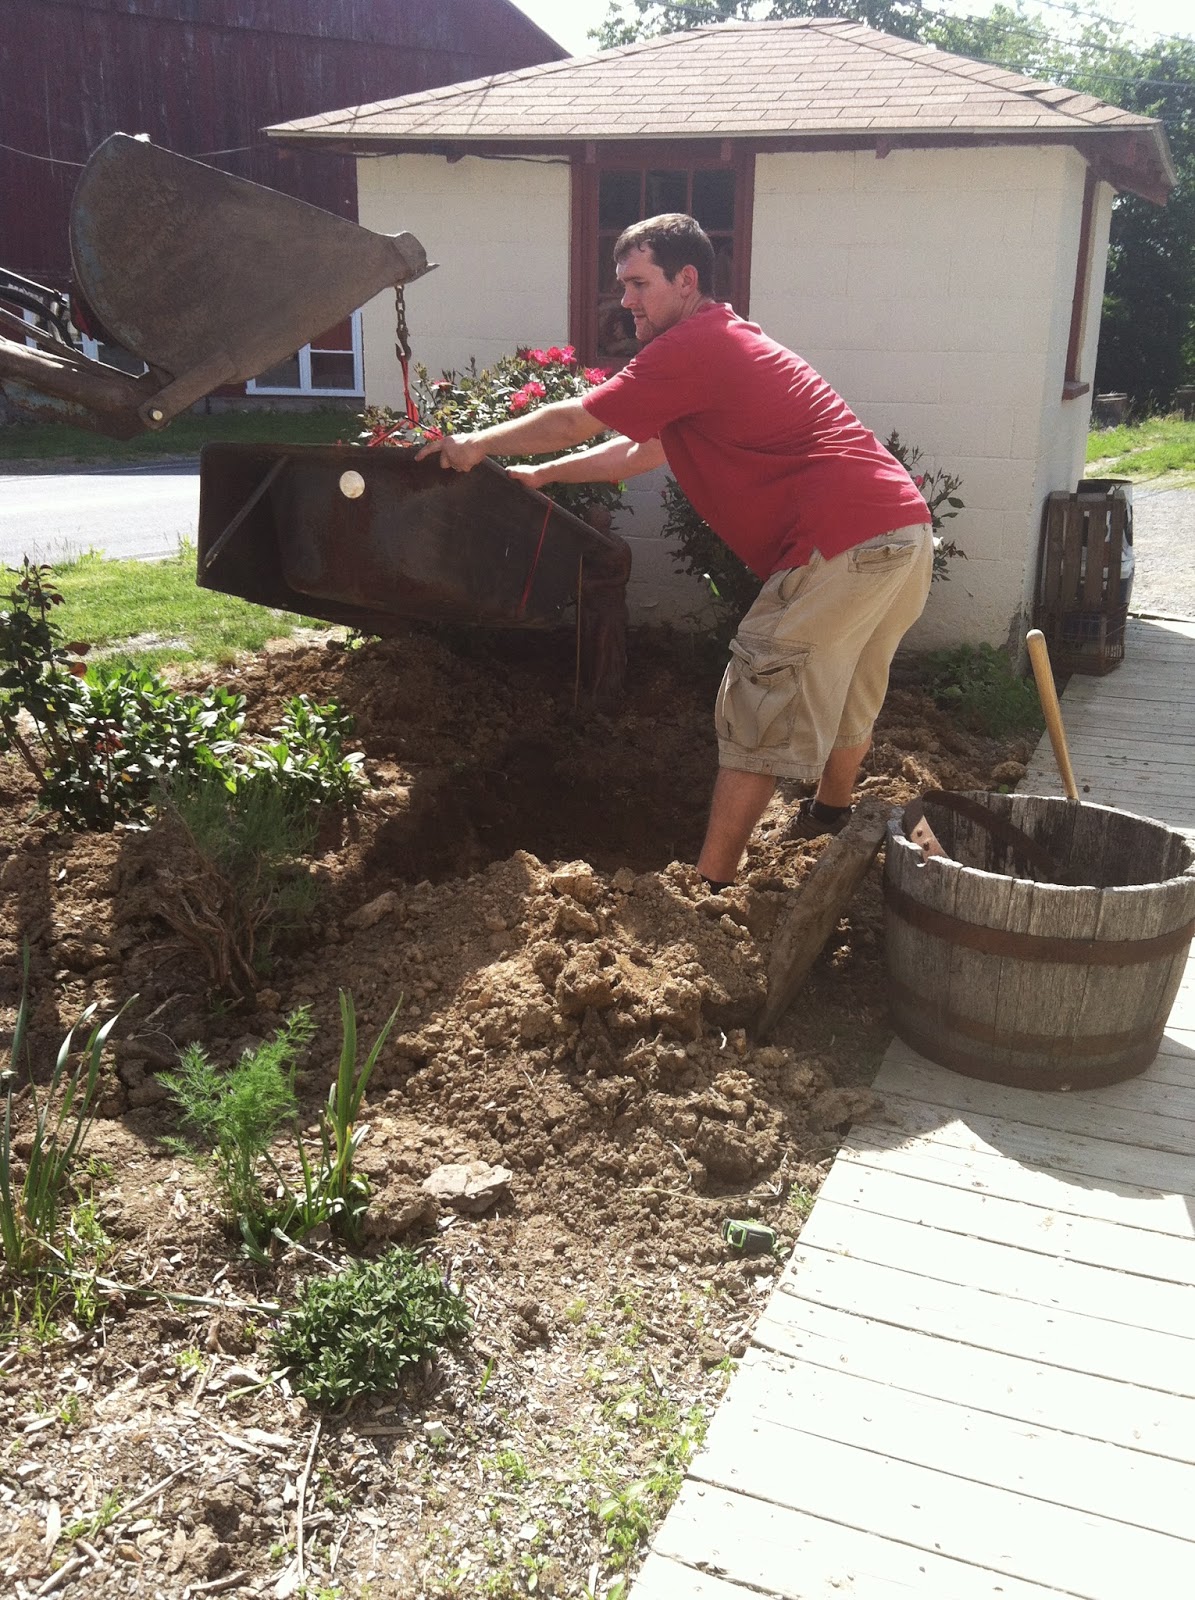
We had a perfect spot already, in the extended herb garden on the side of the house.  I carried the “lady” fountain to this area and we experimented with the perfect position.  Once we determined where the pond should be, I started digging a hole that looked suspiciously like a grave, while the guys (Jeff, Jens and Lars) where doing manly things, fortunately involving the tractor.  

They brought the tub over (with the tractor) and used fiberglass to close the drain and the hole for the faucet. It did not take that long to dig down 30 inches for a 3ft by 5ft hole and as soon as I had this done, the fiberglass had dried.  The guys brought the tractor back and we used it to lift the the bathtub, which Jens helped guide into the hole.  

We leveled the tub, which just took a few smaller rocks, and then I back-filled around the tub with the help of a digging bar to get the dirt into all the cracks.  I used the other end of the bar to pound the dirt tight around the tub.  

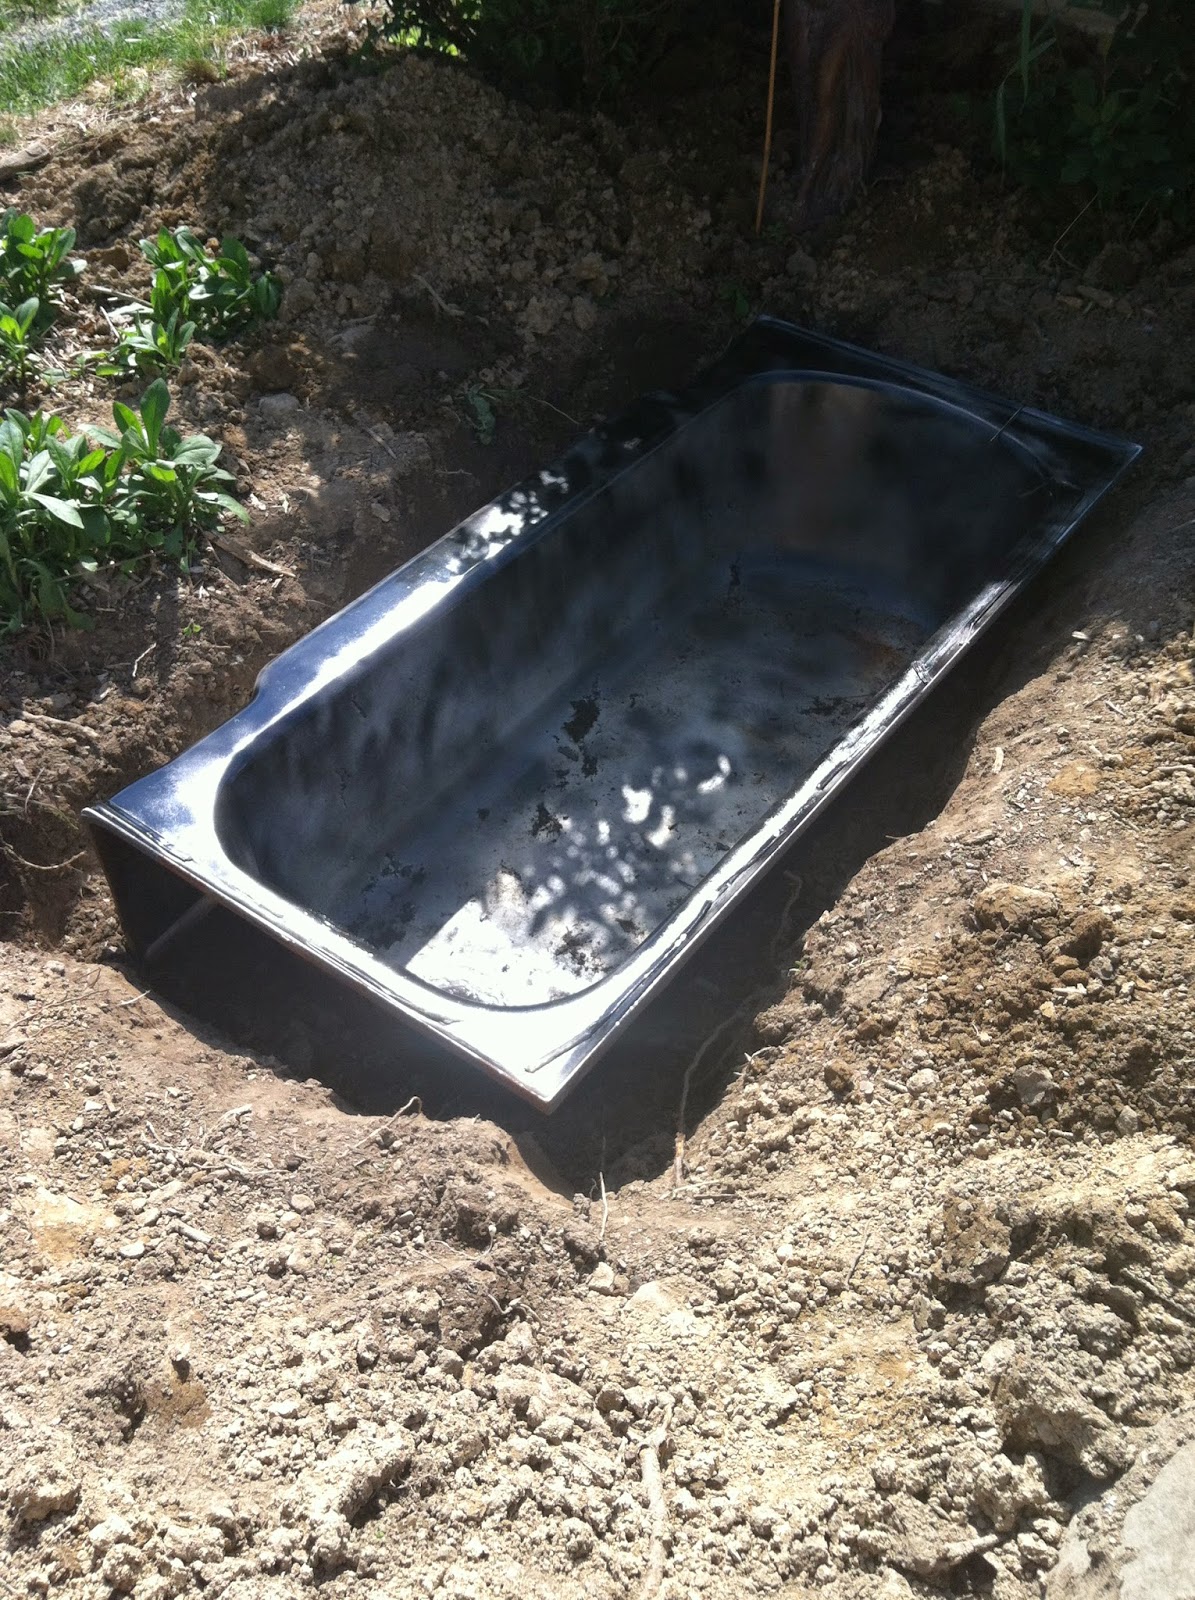
I found several nearly empty cans of spray-paint, all conveniently in shades of camouflage, and spray- painted the tub in a muddled pattern.  I was careful to keep the top edge very solid dark, so that no white would show once it is filled with water. 
While the paint was drying, I gathered a stack of slates (we have a rather large rock pile, including slate from my previous pond at our old house). It took a while to arrange the slates and smaller rocks around the tub, to disguise it’s shape, and make it look more like a pond…it’s kind of like a puzzle – to make odd shaped rocks fit together.
Jeff helped connect the pump to the fountain (which took some finesse), and then I filled the pond and planted more herbs and some flowers around it.  By Sunday evening, the “lady” was pouring water into the little pond and it looked like it had always been there! 

Herb Garden Make-Over

It all started with a visit to the annual Plant Fest & Sale of the Cumberland County Master Gardeners at the Extension Office.   The Extension Office has a nice little herb garden as a demo – which provided some ideas for the make-over plan.  The plant sale featured a lot of herb selections as well as native plants.  Here is what we bought:

Our existing herb garden already had a nice selection of herbs, but it was missing structure and a focal point.  After seeing the demo-herb garden, we realized that what we really needed was a path.  We had a stack of old bricks and a fair sized pile of wood chips – which together were the prefect start for a path.

We used string and a tape measure to find the exact center of the existing herb garden, and marked out a circle.  From there we marked out the paths, and then started digging about a foot deep.  Several existing herbs had to be dug up for transplanting, as did some of the strawberries, which still take up half the herb garden space.  
Once the circle and paths were dug out,  they were lined with bricks, and then filled in with wood chips.  The center of the circle was marked by four curved pre-formed cement sections (which we happened to have lying around as well).  
We planted flowers in the center of the circle and stuck in one of our ‘yard-art’ pieces and then planted our herbs, marking each one.  
This project started Saturday around lunchtime, and was finished before dusk on Sunday.  (Not too bad for Sammy and Tina) 

Kitchen Remodel Nearly Done

For the most part, the kitchen is done – just in time for Lars’s 16th birthday celebration.  We are still searching for the perfect wallpaper above the cabinets, but there is no rush – after all, it WILL be spring soon, and the vineyard needs a lot of work yet.


We even got a new kitchen faucet (thanks to Zach & Rachel’s birthday gift to Jeff – and Jens for helping to install it).  It is so nice to have a single handle faucet with a very high spout – high enough for 5 gallon buckets or washing carboys easily. And.. no more dripping faucet either.  What a great make-over this was!  I just love DYI projects that make such an impact.

Posted in DIY