Home Improvement Project: Bathroom – Week 1

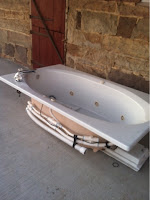
We finally bought a whirlpool tub – we’ve been searching for one ever since we moved, as that is one thing we gave up and have been missing.  So the tub sits in front of the barn, under the overhang, waiting for us to expand the size of the downstairs bathroom to accommodate it.

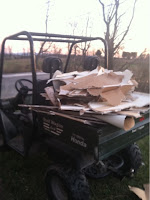
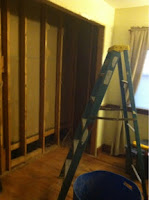
This weekend we finally got started by tearing out the closest in the downstairs guest room and pulling off the drywall.  That allowed us to figure out which walls are weight bearing, and which way the ceiling joists run, which is step number 1 for tearing out walls 🙂

The plan is to increase the bathroom size about 2 feet in length, and 4 feet in width.  This should allow us to put in the significantly larger tub, as well as a double sink (which we have had in storage for years).  One step at a time.  School is off tomorrow, so Lars will be home to help Jeff with more demolition.

Posted in DIY

Fancy Fingerless Gloves

Seems that I get the sudden urge to knit every year around Christmas time – it becomes an obsession, and there is nothing like the approaching deadline of holiday gift-giving to finish projects.  This year, I became fascinated by fingerless gloves.  They don’t take too long to complete and it is fun to experiment with more intricate lacy designs.  Most of the patterns I used came out of  the “One Skein Wonders” book, though I also found patterns in some of my older knitting magazines.  Here are some of the gloves I finished in Decembers:


Easy Firestarters for the Woodstove

We’ve tried lots of different ways to start fires, from soaking dried pine cones in hot wax to using a blow torch…but the best way we found to get our wood stove fire going is to make simple fire starters out of old candles and paper towels.  We burn a lot of candles, especially during the holidays, and we always save the left-over wax.  Come winter time, we melt the wax in a pot on our stove, using a low setting for the burner.  When all the wax is melted, we use single sheets of paper towels, which we twist to form sort of a rope, and quickly dip these into the melted wax.  We then lay them out to dry on freezer paper (or aluminum foil).  Once they are dried, we store them in a bucket or bag until we need them.  We still use a blow torch to get a fire going, but the wax soaked paper keeps the flames going for a long time, enough to get the kindling pieces burning.
Posted in DIY

More Uses for Grapevines

This afternoon, Jeff and Samantha figured out how to make a basket from grapevine trimmings.  After searching for grapevine basket images on google and closely examining willow baskets from Tina’s collection, they just made one:

After dinner Jeff decided to keep working on another basket, on the back porch this time – apparently basket weaving had created quite a mess in the kitchen earlier.  It was a relatively warm evening, and they already had a lot of cut vines.  What can I say – one can never have enough baskets….

Here are some other things we had made from grapevines previously: decorations around a rustic birdhouse (Jeff made this from old weathered barn boards), and a grapevine Christmas tree (really a re-purposed tomato cage, wrapped closely in grapevines and embellished with a string of brown wired fairy lights)


Grapevine Wreaths

A little side benefit from growing grapes is an abundance of grapevines that need to be trimmed off every year.  We’ve been getting better at making wreaths – one at a time…

The largest wreath we made so far was measured around the outside of our round patio table.  We used an old woven wire fence panel to support the wreath.  When we had wrapped sufficient vines to make the wreath the size we liked, we fastened the wreath to the fence panel with wire.  We then cut around the outside and inside of the panel with wire cutters, basically making a wire form on the back of the wreath to keep it stable.  We then fastened several strings of brown wired fairy lights to the wreath.  Duff and Caleb helped to get the wreath positioned at the peak of the barn – climbing to the vent from the inside of the barn, they lowered a rope, which we used to pull up the wreath.  Inside the barn a very long extension cord with a timer connects the light strings of the wreath to an outlet.

We also made some smaller wreaths and Lars is getting rather good at it:

 
We use the wreaths for decorating outside and inside:
 
Wreath underneath bell
Wreath wrapped with bells