 With the warmer temperatures, we were able to do the basic concrete work that is literally the foundation of fixing the exterior wall on the back of the upper barn. We needed to reinforce the section of the loading area, in front of the stone wall, so we can then install a new footer and frame in the barn doors.
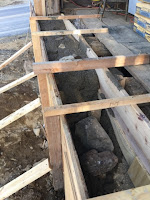
The first step was building a “form”, into which the concrete would be poured. We used plywood, reinforced with 2×4’s and metal posts. We did this 2 weekends ago, which meant that the old barn doors could not be closed tightly, as the “form” stuck out too much. We had to use old barn beams to prop the doors shut from the outside. Luckily, this held the doors for a week.
 On Saturday, we started mixing and pouring concrete – we all worked on this most of the day. Zach brought over his electric cement mixer, and while he mixed the concrete, Lars would use the wheelbarrow to take the mixed concrete and pour it into the form, where Jens would poke it down and use an air driven drill with a blunted tip to “vibrate” the concrete by pushing the running drill on the outside of the form. We used 70 bags of concrete on Saturday, and as we got near the end, one side of the form gave out under all the pressure – we lost about half our work 🙁
On Sunday, we got more concrete, fixed the form and reinforced it even more, and started the process over. We did get it all done by the middle of the afternoon.
This evening, we “popped” the form off, and could admire the new outside wall of what will be the loading area for the upper barn.