Chronicles of the Long Shot Farm

Apple Bread

We discovered a new favorite bread recipe and I wanted to share it.  This came about because we ended up with several bushes of apples this weekend and were looking for some new recipes to try.  We had made a pot of apple sauce already that day, so all required ingredients were readily available.

We use our breadmachine to mix and knead the dough – on the dough cycle only – and then bake it in a regular oven.  But the same recipe can be hand kneaded the old fashioned way.

For use with breadmachine, place the following ingredients in the machine in the order shown:

  • 1/2 cup milk
  • 2/3 cup warm applesauce
  • 1/2 cup freshly shredded apple (I may have used more than that)
  • 1 Tablespoon softened butter (I cut mine up in small pieces)
  • 4 Tablespoons white sugar
  • 3/4 cup whole wheat flour
  • 2 1/2 cup bread flour (all bread will turn out better with bread flour due to higher gluten content)
  • 1/2 teaspoon salt
  • 1/2 teaspoon ground cinnamon
  • 1/8 teaspoon ground nutmeg
  • 2 1/4 teaspoon bread machine yeast

Turn on dough cycle – our machine takes about 1.5 hours for the cycle to complete, take out dough – if too moist, knead with some additional flour until dough does not stick anymore, shape dough and place in buttered bread pan.  (I like to roll the dough around in the pan, so the dough is covered with a little butter on all sided).  Then let rise in a warm place.  Bake at 375 degree F for 30 minutes.  Place on wire rack to cool and immediately cover top crust with butter, to keep it soft.  (I simply use a cold stick of butter and run the end across the bread – the butter melts immediately to cover the bread)

Perfect for breakfast with a little jam or honey!

Getting Ready to Renovate the Little Shed

Jens and Grace came over to help Jeff with the pointing in the barn today- they are making progress, despite the colder weather. The rest of us, including Anja and Duff, spent most of the day completely emptying out the shed across the street. The plan is to rewire and then insulate and dry-wall the inside, making it our weaving/sewing/quilting and arts room.
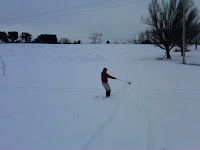
Duff found an old shot put ball, into which Jeff had screwed an eye hook (he used it as a boat anchor for a while)…Duff attached a chain he found and “played” in the snow – flinging it as far as he could:

Fiberarts this Weekend (and more pointing in the barn)

Since it is still wrestling season, most weekends are swallowed up by tournaments, which has always been a good time to get caught up on knitting… Finished three hats this year already:

This afternoon Anja and Tina spent some time weaving:  a scarf on the small loom, and more place mats on the large loom:

Making a Viking Hat – ala “How to Train Your Dragon”

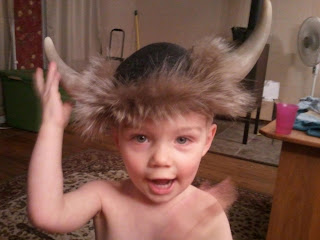
Probably one of our most favorite animated movies ever has been “How to Train Your Dragon”.  One of the scenes, where “Hiccup” gets his first viking hat, has been the inspiration for our creation of this toddler sized version.

Before describing the assembly of this hat, it is important to recall the scene where “Stoic the Vast” (Hiccup’s father) hands his son the hat… pointing out that is has been fashioned out of half of his mother’s breast-shield  (and thus matches his father’s).

We made this hat entirely from items “found” around our house and yard:

  1. a fairly large sized bra (recommended double “G” – or other size to fit child’s head), that has been accidentally left by a visiting relative (hence “found”), ideally the child’s mother**
  2. fiberglass resin
  3. fiberglass body filler
  4. 2 large fender washers and drywall screws
  5. 2 cow horns (boiled and scraped clean)
  6. scissors, needle and thread
  7. hot glue gun and glue
  8. scraps of fur (we used raccoon, could use artificial trim)

** may want to get permission from her husband before attacking the bra if intended as a surprise

Assembly:
Cut one of the cups off the bra and paint it with fiberglass resin.  Let dry (following directions)… we let ours dry overnight.

Fill cow horns with body filler and let harden.  Mark position of horns on “hat”, and from inside, hold a fender washer and screw drywall screw through washer into the center of the cow horn.  Repeat on other side.

Cut off sections of the back of the bra with the hook and eyes and glue into position on the back part of the hat (for adjustable straps).  After gluing, sew on permanently with needle and thread.

Cut left over fur into narrow strips and hot glue into place for decorations…and voila:

Posted in DIY

More Grading Reveals Date on Barn

Jeff spent most of this afternoon grading the front of the barn – not just in front where we had the cement truck – but also alongside the road to keep the water from running into our yard.  Lars and Tina got to shovel away some of the high spots …  It looks really good already, once winter is over we’ll use the disc, then rake it and plant grass again.

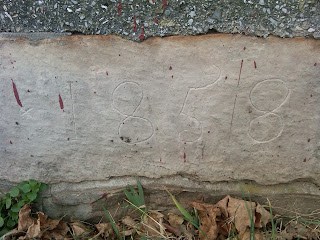
As we were shoveling some of the ground away from the front corner of the barn, we found the date and someones initials on one of the foundation stones:  1858!